Maintaining Your Emergency Kit: A Yearly Checklist
Why a Yearly Emergency Kit Checklist is Crucial for Preparedness
Alright folks, let's talk emergency kits. You’ve probably got one tucked away somewhere – maybe in the garage, a closet, or even the trunk of your car. But here's the thing: having an emergency kit isn't enough. It's like owning a car and never getting an oil change. You might think it’s fine, until suddenly, it's not. That's where a yearly checklist comes in. It's your proactive way of ensuring your kit is actually ready when you need it most. Think of it as a little bit of maintenance for a whole lot of peace of mind.
Food and Water Storage Essentials for Your Emergency Kit
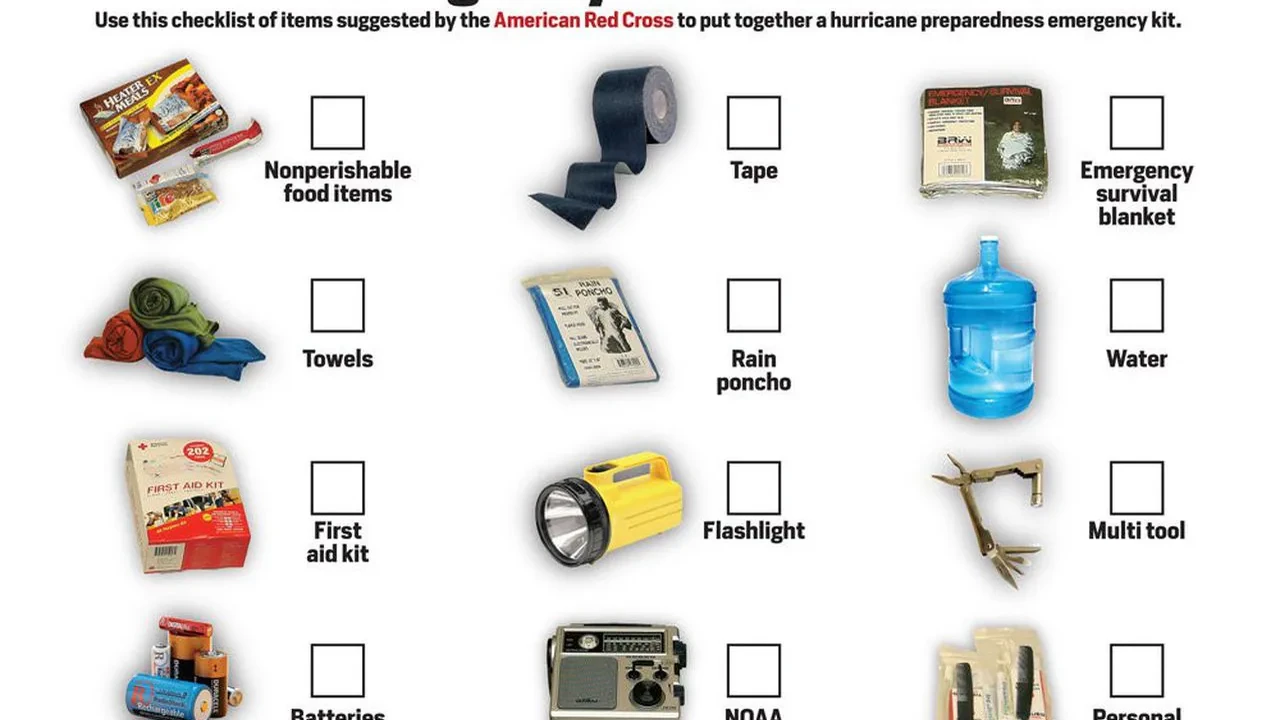
Okay, let's dive into the nitty-gritty of food and water. These are your survival staples. First up, water. The general rule is one gallon per person per day for drinking and sanitation. Sounds like a lot? It is! But trust me, you'll be thankful you have it. Consider pre-packaged water pouches – they're compact and have a long shelf life. For example, Datrex Emergency Water Pouches are a popular choice. They're US Coast Guard approved and can last for five years. A 64-pouch case typically costs around $30-$40. Another option is a water filter like the LifeStraw Personal Water Filter. This allows you to purify water from natural sources (streams, lakes, etc.). It's lightweight, easy to use, and costs about $20. For food, think non-perishable, high-calorie items. Canned goods are great, but they're heavy. Energy bars, dried fruit, nuts, and MREs (Meals Ready to Eat) are all excellent choices. SOS Food Labs Emergency Food Rations are another good option. They're designed to provide 3600 calories in a single bar and have a 5-year shelf life. A pack of nine bars costs around $25-$35. Remember to check expiration dates and replace anything that's past its prime. Nobody wants a stale granola bar during an emergency.
First Aid Kit and Medical Supplies Checklist for Emergencies
Next up: the first aid kit. This is your mini-hospital in a bag. A comprehensive first aid kit should include bandages of various sizes, antiseptic wipes, pain relievers (like ibuprofen and acetaminophen), gauze pads, medical tape, antibiotic ointment, burn cream, scissors, tweezers, a CPR mask, and gloves. Consider buying a pre-made kit like the Adventure Medical Kits Ultralight/Watertight Medical Kit. It’s designed for backpacking but works great for emergency preparedness. It's lightweight, waterproof, and contains a good assortment of supplies. It usually costs around $40-$50. Don't forget to add any personal medications you or your family members require. And make sure you know how to use everything in the kit! A basic first aid course from the Red Cross is highly recommended. Speaking of specific products, Neosporin antibiotic ointment is a must-have for preventing infection in cuts and scrapes. A small tube costs around $5. Band-Aid Brand Flexible Fabric Bandages are also essential – they stay on well and provide good protection. A box of 30 bandages costs around $7. Regularly check expiration dates on medications and replace anything that's expired or running low. Also, consider adding a small first aid manual to your kit. Knowledge is power!
Tools and Equipment Essential for Survival Situations
Now for the tools! These are the things that will help you get things done. A multi-tool like the Leatherman Wave Plus is invaluable. It includes pliers, screwdrivers, a knife, a saw, and more. It’s a bit pricey (around $100-$120), but it’s worth the investment. A good flashlight is also essential. The Fenix PD35 TAC is a popular choice. It's bright, durable, and has multiple light modes. It costs around $70-$80. Don't forget extra batteries! A hand-crank or solar-powered radio is also a good idea for staying informed. The Midland ER310 Emergency Crank Weather AM/FM Radio is a solid option. It also has a USB port for charging your phone. It costs around $50-$60. Other useful tools include a whistle, a compass, duct tape, a knife, a fire starter (like waterproof matches or a ferro rod), and a portable stove. UST SparkForce Fire Starter is a reliable ferro rod that works even when wet and costs around $15. Duct tape is incredibly versatile – you can use it to repair almost anything! A roll of Duck Brand Duct Tape costs around $5. And remember to check the condition of your tools regularly. Make sure your flashlight works, your knife is sharp, and your batteries are fresh.
Clothing and Shelter Considerations for Your Emergency Preparedness Kit
Let's talk about staying warm and dry. Even in warm climates, temperatures can drop unexpectedly, especially at night. Pack extra clothing, including warm socks, a hat, gloves, and a waterproof jacket or poncho. A mylar blanket is also a good idea – it's lightweight, compact, and reflects body heat. The Grabber Outdoors Original Space Brand All Weather Blanket is a classic choice. It costs around $5. For shelter, consider a lightweight tent or tarp. The Kelty Noah's Tarp 12 is a versatile tarp that can be used in a variety of configurations. It costs around $60-$70. A sleeping bag is also essential for staying warm. The Coleman Sun Ridge 40 Degree Sleeping Bag is a good budget-friendly option. It costs around $30-$40. Make sure your clothing is appropriate for the climate you live in. If you live in a cold climate, you'll need heavier clothing and a warmer sleeping bag. And remember to pack extra socks! Wet socks can lead to hypothermia. Consider wool or synthetic socks, as they retain warmth even when wet. A good pair of wool socks like Smartwool Hike Light Crew Socks costs around $20. Rotate your clothing periodically to ensure it's still in good condition. Check for tears, holes, or mildew.
Documents and Communication Strategies for Emergency Situations
Don't forget important documents! Make copies of your driver's license, passport, insurance cards, and other important documents. Store them in a waterproof bag. Also, include a list of important phone numbers and addresses. A pre-paid phone is also a good idea, in case your primary phone loses power. Consider a simple, durable phone like the Nokia 110 4G, which costs around $30. Pre-load it with some credit and keep it switched off until needed to preserve battery life. A hand-crank charger can also be a lifesaver. The FosPower Emergency Solar Hand Crank Portable Radio includes a phone charger and costs around $30. Communication is key in an emergency. Have a plan for how you will communicate with your family members. Designate a meeting place in case you get separated. And make sure everyone in your family knows the plan. Also, consider investing in a two-way radio like the Motorola T100 Talkabout Radio. These are great for short-range communication and don't require cell service. A pair costs around $30. Regularly update your list of important phone numbers and addresses. And practice your communication plan with your family. It’s better to be prepared than to be caught off guard.
Specific Product Recommendations and Comparisons for Emergency Kits
Let's break down some specific product comparisons. For water filtration, you have the LifeStraw Personal Water Filter (around $20) versus the Sawyer MINI Water Filtration System (around $25). The LifeStraw is simpler to use, while the Sawyer MINI has a longer lifespan and can be attached to a water bottle. For flashlights, the Fenix PD35 TAC (around $75) is a high-performance option, while the Anker Bolder LC40 Flashlight (around $20) is a more budget-friendly choice. The Fenix is brighter and more durable, but the Anker is still a reliable option for everyday use. For multi-tools, the Leatherman Wave Plus (around $110) is a top-of-the-line option, while the Gerber Suspension Multi-Plier (around $30) is a more affordable alternative. The Leatherman is more durable and has more features, but the Gerber is still a good option for basic tasks. For emergency food, SOS Food Labs Emergency Food Rations (around $30 for a pack of nine) are a compact and long-lasting option, while canned goods are a more readily available and affordable choice. However, canned goods are heavier and require a can opener. Consider your individual needs and budget when choosing products for your emergency kit.
Customizing Your Emergency Kit for Specific Needs and Environments
One size doesn't fit all when it comes to emergency kits. If you live in an area prone to earthquakes, you'll need to include different items than if you live in an area prone to hurricanes. If you have young children or elderly family members, you'll need to customize your kit to meet their specific needs. For example, if you have young children, you'll need to include diapers, formula, and baby food. If you have elderly family members, you'll need to include extra medications and assistive devices. Also, consider any specific medical conditions you or your family members have. If you have allergies, be sure to include an EpiPen. If you have diabetes, be sure to include extra insulin and glucose tablets. And if you have any other medical conditions, be sure to include any necessary medications and supplies. Think about your specific risks and vulnerabilities and tailor your kit accordingly.
Storage and Organization Tips for Maximizing Emergency Kit Efficiency
How you store your emergency kit is just as important as what you put in it. Choose a durable, waterproof container that's easy to carry. A plastic tote or a backpack are both good options. Label the container clearly so you can easily identify it in an emergency. Store your kit in a convenient location that's easily accessible to all members of your household. A garage, closet, or under the bed are all good options. Keep a smaller, portable kit in your car. Organize your kit so that you can easily find what you need. Use clear plastic bags or containers to separate different items. Keep a list of the contents of your kit inside the container. Regularly rotate the contents of your kit to ensure that everything is fresh and in good condition. Replace expired food and medications. And check the batteries in your flashlight and radio. A well-organized kit will save you valuable time and effort in an emergency.
Regular Drills and Practice Sessions for Emergency Preparedness
Having an emergency kit is only half the battle. You also need to know how to use it. Practice using the items in your kit. Learn how to use your flashlight, radio, and first aid kit. Conduct regular drills with your family. Practice your evacuation plan. And discuss what to do in different emergency scenarios. The more you practice, the more prepared you'll be. Also, consider taking a first aid and CPR course. This will give you the skills and knowledge you need to help yourself and others in an emergency. And stay informed about potential threats in your area. Monitor weather reports and emergency alerts. And be aware of the risks of natural disasters, terrorism, and other emergencies. Knowledge is power! The more you know, the better prepared you'll be.
:max_bytes(150000):strip_icc()/277019-baked-pork-chops-with-cream-of-mushroom-soup-DDMFS-beauty-4x3-BG-7505-5762b731cf30447d9cbbbbbf387beafa.jpg)