How to Signal for Help on the Roadside: Effective Methods

Roadside Emergency Signaling Mastering the Basics for Safety
Okay, so you're stuck on the side of the road. Not ideal, right? First things first, don't panic. Let's break down the absolute basics of signaling for help. We're talking about things everyone should know, whether you're a seasoned driver or just got your license.
Your car is your first signaling device. Hazard lights are your best friend. Flip 'em on immediately. They scream, "Hey, I'm in trouble!" even from a distance. Next, think about placement. If possible, pull as far off the road as you can. The further you are from traffic, the safer you'll be. But be smart about it – don't risk getting stuck in a ditch or on soft ground.
Beyond the car, consider your surroundings. Is it daytime? Nighttime? Foggy? This will impact how visible you are. During the day, bright colors are your ally. A brightly colored vest or even just a brightly colored cloth tied to your antenna can make a huge difference. At night, reflective materials are key. If you have reflective triangles or flares, now's the time to use them.
And remember, safety first! Always be aware of your surroundings. Don't stand in the path of oncoming traffic. If you have to walk, walk facing traffic so you can see what's coming.
Effective Visual Signals for Roadside Assistance: Day and Night
Let's dive deeper into visual signals. Daytime offers different opportunities than nighttime. During the day, think about movement and contrast. Waving a brightly colored cloth or even your arms can catch attention. Consider using your car's hood as a signaling tool. Popping the hood can indicate you're having mechanical trouble.
At night, visibility is paramount. Flares are a classic option, but be careful! They're hot and can be dangerous if not handled properly. Make sure you know how to use them *before* you need them. Reflective triangles are a safer alternative, but they need to be placed strategically to be effective.
Think about the distance you want your signal to be seen. Flares are visible from a greater distance than reflective triangles. Also, consider the weather. Fog or rain can significantly reduce visibility. In these conditions, you might need to use multiple signaling methods to ensure you're seen.
Don't forget about your phone! While it's not a visual signal, it's arguably the most important tool you have. But what if you have no service? That's when these visual signals become even more critical.
Using SOS Signals and Emergency Beacons for Urgent Help
Okay, let's talk about SOS signals. The universal distress signal is three short, three long, and three short signals. You can use this with a flashlight, your car horn, or even by shouting. It's a recognized signal that should be understood by anyone who sees or hears it.
Emergency beacons, also known as personal locator beacons (PLBs), are another option. These devices use satellite technology to transmit your location to emergency services. They're more expensive than flares or reflective triangles, but they can be a lifesaver in remote areas with no cell service.
When using an emergency beacon, make sure you understand how it works and that it's properly registered. False alarms can tie up valuable resources and could even result in a fine. Only use it in genuine emergency situations.
Roadside Assistance Apps and Digital Signaling Options
In today's world, there are tons of apps designed to help you in roadside emergencies. Apps like AAA, Urgent.ly, and Honk connect you with roadside assistance providers with the tap of a button. They can pinpoint your location and dispatch help quickly.
Many modern cars also have built-in emergency assistance systems like OnStar. These systems can automatically detect a crash and alert emergency services, even if you're unable to. They can also provide assistance with things like flat tires or dead batteries.
But remember, technology isn't always reliable. Cell service can be spotty, and batteries can die. It's always a good idea to have a backup plan in case your digital signaling options fail.
Recommended Roadside Safety Products: Reviews, Comparisons, and Pricing
Alright, let's get down to specifics. Here are a few roadside safety products I recommend, along with their pros, cons, and approximate prices:
H2 Best Emergency Flares: Orion Safety Products 30-Minute Flare
Product: Orion Safety Products 30-Minute Flare
Use Case: Ideal for nighttime emergencies where high visibility is crucial. Great for signaling to oncoming traffic from a distance.
Pros: Bright, long-lasting (30 minutes burn time), highly visible even in adverse weather conditions.
Cons: Can be dangerous if not handled properly, emits smoke, not environmentally friendly.
Price: Approximately $15-$20 per flare.
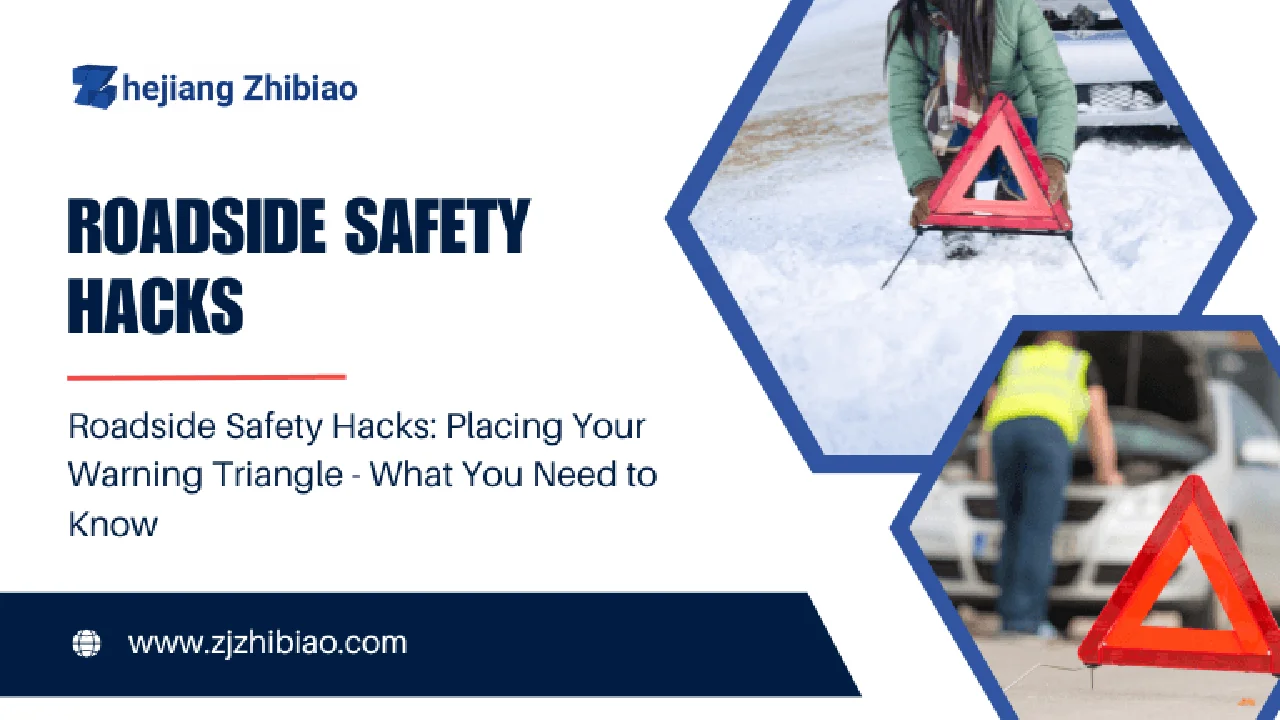
H2 Top Reflective Warning Triangles: CARTMAN Foldable Reflective Warning Triangle
Product: CARTMAN Foldable Reflective Warning Triangle
Use Case: Safe and reusable alternative to flares. Best used in conjunction with hazard lights to warn oncoming traffic.
Pros: Safe, reusable, easy to store, highly reflective.
Cons: Less visible than flares, requires proper placement for optimal effectiveness.
Price: Approximately $20-$25 for a set of three.
H2 Premium Portable Jump Starter: NOCO Boost Plus GB40 1000 Amp 12-Volt UltraSafe Lithium Jump Starter Box
Product: NOCO Boost Plus GB40 1000 Amp 12-Volt UltraSafe Lithium Jump Starter Box
Use Case: Starting a car with a dead battery without needing another vehicle. Also functions as a power bank for charging devices.
Pros: Compact, powerful, easy to use, safe (spark-proof technology), can also charge USB devices.
Cons: Relatively expensive, requires periodic charging.
Price: Approximately $100-$120.
H2 Best Value Emergency Roadside Kit: Lifeline AAA Premium Road Kit
Product: Lifeline AAA Premium Road Kit
Use Case: A comprehensive kit containing essential tools and supplies for common roadside emergencies. Includes jumper cables, first aid kit, flashlight, and more.
Pros: Convenient, comprehensive, relatively affordable, includes a variety of useful items.
Cons: Quality of some items may be lower than buying individually.
Price: Approximately $50-$70.
H2 Reliable Personal Locator Beacon (PLB): ACR ResQLink View – Buoyant GPS Personal Locator Beacon with Display
Product: ACR ResQLink View – Buoyant GPS Personal Locator Beacon with Display
Use Case: Signaling for help in remote areas where cell service is unavailable. Transmits your location to emergency services via satellite.
Pros: Reliable, global coverage, waterproof, transmits precise location, has a display for confirmation.
Cons: Expensive, requires registration, only for genuine emergencies.
Price: Approximately $350-$400.
Comparing Roadside Assistance Options: AAA vs. Other Services
AAA is the big name in roadside assistance, but there are other options to consider. Companies like Allstate Roadside Services, Better World Club, and even your car insurance company often offer roadside assistance plans.
AAA offers different levels of membership with varying benefits. The higher the level, the more services you get, such as longer towing distances and more comprehensive coverage. AAA also provides discounts on travel and entertainment.
Other roadside assistance services may be cheaper than AAA, but they may not offer the same level of coverage or the same network of providers. It's important to compare the details of each plan before making a decision.
Consider your driving habits and where you typically drive. If you frequently travel in remote areas, a more comprehensive plan with longer towing distances might be worth the extra cost. If you only drive locally, a basic plan might be sufficient.
DIY Roadside Repair: When to Attempt and When to Call for Help
Sometimes, you can fix a minor problem yourself and get back on the road quickly. Changing a flat tire, jump-starting a dead battery, or adding coolant are all things that many drivers can handle with the right tools and knowledge.
But there are times when it's best to call for help. If you're not comfortable performing a repair, or if the problem is beyond your skill level, don't hesitate to call roadside assistance. It's better to be safe than sorry.
Also, consider the location. If you're on a busy highway or in a dangerous area, it's best to wait for help to arrive rather than trying to fix the problem yourself. Your safety is the top priority.
Staying Safe While Waiting for Roadside Assistance
Waiting for roadside assistance can be stressful, but it's important to stay calm and stay safe. First, make sure your hazard lights are on. Then, stay inside your vehicle with your seatbelt fastened. If you have to get out of the car, do so on the side away from traffic.
Keep an eye on your surroundings. If you see anything suspicious, call 911. Don't approach strangers who offer assistance unless you've verified that they're with a legitimate roadside assistance company.
Let someone know where you are and when you expect help to arrive. This way, if something goes wrong, someone will know to check on you.
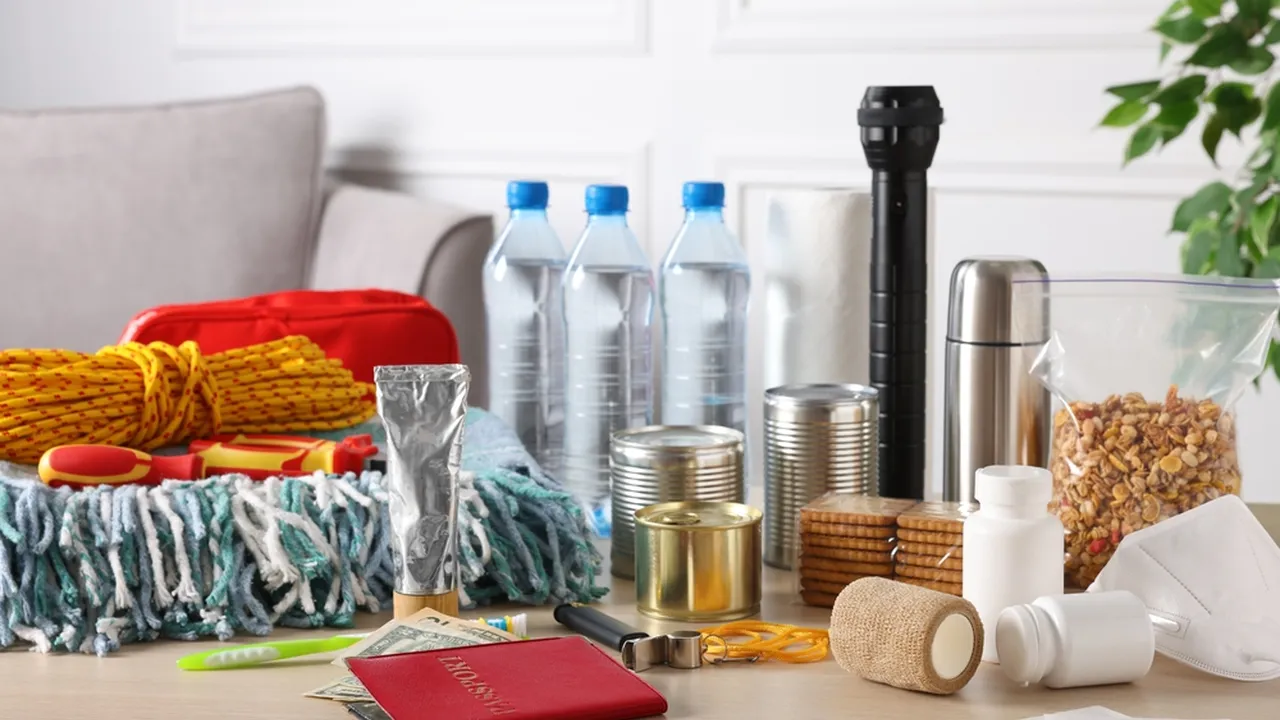
Essential Roadside Safety Kit Checklist: What to Keep in Your Car
Having a well-stocked roadside safety kit can make a big difference in an emergency. Here's a checklist of essential items to keep in your car:
- Jumper cables
- First aid kit
- Reflective warning triangles or flares
- Flashlight with extra batteries
- Tire pressure gauge
- Multi-tool or wrench set
- Duct tape
- Gloves
- Blanket
- Water
- Snacks
Customize your kit to fit your specific needs and the climate in your area. If you live in a cold climate, you might want to add extra blankets and warm clothing. If you have allergies, make sure your first aid kit includes appropriate medications.
:max_bytes(150000):strip_icc()/277019-baked-pork-chops-with-cream-of-mushroom-soup-DDMFS-beauty-4x3-BG-7505-5762b731cf30447d9cbbbbbf387beafa.jpg)